
This post may contain affiliate links.

Padel is booming and as a result, about 100 new padel courts are opened every week in the European countries where padel is most popular. If you are keen to learn more about the popularity of padel, check out this article. But that is of course only after you have read this article since you are looking for realistic times to build a padel court.
Let me start out by saying that building a padel court is very much front-end loaded in the sense that planning and design eat up the most time. As with many construction projects, obtaining the required permits can be a tedious endeavor for which timelines are hard to predict. Nevertheless, the process from idea to opening looks something like this:
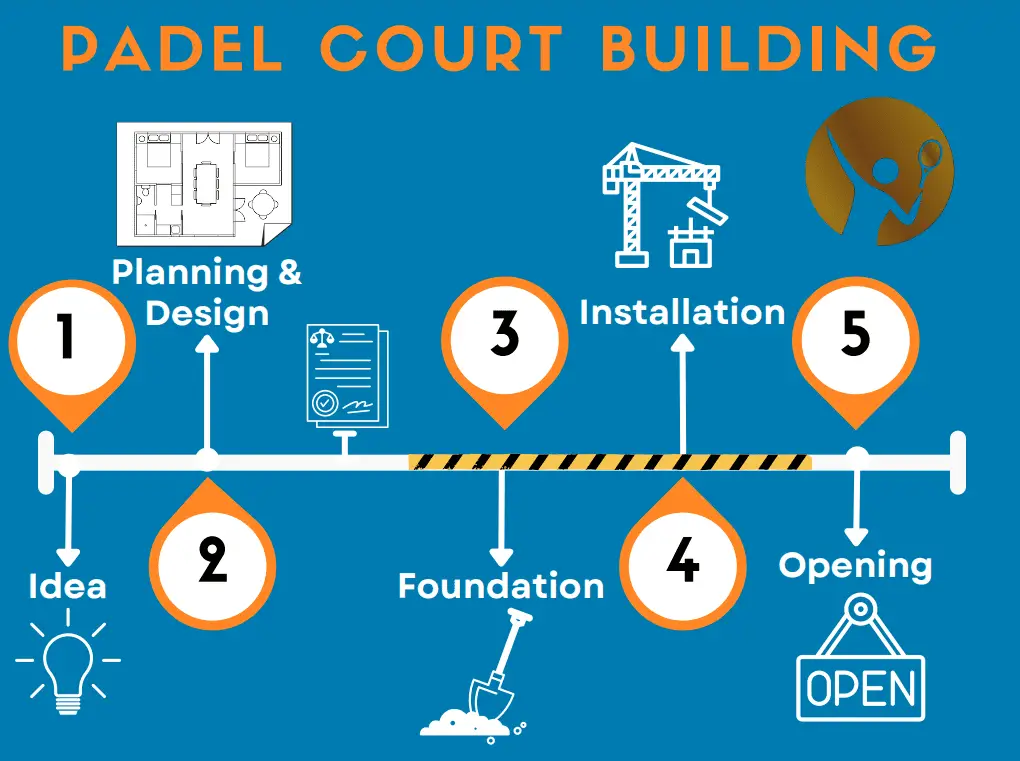
While some people refer to the construction (including groundworks), others only consider the installation (excluding any foundational work) when mentioning timelines for building a padel court. Therefore let’s look at the timelines for both of them.
How Long Does It Take To Install A Padel Court?
Padel court installation takes on average 5 days, while it can take up to 15 days depending on the experience level of the installation company and the design of the court. After obtaining the required permits, padel court construction including groundwork usually takes between 30 to 40 days.
Next, we will take a closer look at the court installation process and the steps involved. Since there is a difference between the padel court installation and the full construction process, we put our focus first on the padel court installation process and later on discuss the preparations that are required before installing a padel court.
Padel Court Installation : Process Overview
- Mount the metal posts into the foundation. The posts form the demarcation of the courts, however, it might be necessary to use a curb to fully enclose the court and keep the artificial turf in its place. While most padel courts use a concrete beam and this is recommended, the posts can also be fixed on concrete pillars. The number of posts is dependent on the type and design of the court. So-called panoramic courts have fewer posts to increase the visibility for spectators.
- Install the welded mesh panels between the metal posts. These panels usually are placed at a height of 3 meters on both back walls and near the center of both side walls. As a result, it forms a proper cage, but of course, still missing the glass panels.
- Install the tempered glass panels between the posts. To fully encapsulate the court, 12mm tempered glass panels are placed between the posts. While 12mm is recommended by most manufacturers, these glass panels are also available with a thickness of 10mm.
- Install the lighting system. Outdoor courts make use of a lighting system that is part of the steel construction, mainly as an extension of the metal posts. Another possibility is to place lighting posts outside the court, for example between two adjacent courts. While many indoor padel courts also make use of one of these setups, it is also possible to have lighting hung at the ceiling of the indoor facility.
- Artificial grass installation. While there are different types of turf on the market, installation is the same. Before the turf can be installed, the surface is cleaned. Then the turf is rolled out and cut to size. If all turf is rolled out, the pieces are connected to make it one court.
- Adding and sweeping in the sand with brooms to distribute the sand evenly across the court. Sand is an important factor to increase the durability of padel courts. Want to find out why, check out this article that also covers why sand is used.
- Install net posts and the net. The net posts are placed and exactly divide the court into two halves. The net is subsequently placed between the two posts. Most padel courts have branding printed on the top of the net.
- Apply padel court protectors to the door frame and net posts. These protectors are made of foam to provide cushioning and reduce the risk of players getting injured. This mainly applies when out-of-court play is allowed. While running out of the court, players risk bumping into these posts. Next to that, it gives another opportunity to include branding.
- Apply even more branding to the court. Most courts have branded vinyl stickers on the glass panels with the logo of your club or sponsor. You will frequently find court (including turf) manufacturer brands on these glass panels as well.
- Ultimately some optional products can be installed, such as net stops. These nets are usually placed above the back walls and/or near the entrances/exits to block balls between the courts.
While this covers the setup for a padel court in general, there can be numerous other steps that are largely related to turning it into a padel facility. Think about benches, acoustics, pathways, trash bins, and many other facilities and equipment.
If you want to get a feeling of steps 5, 6 (and 9), check out this video below from Mondo, one of the biggest names when it comes to artificial grass for padel courts.
Preparations for Padel Court Installation
Planning
Before the actual building can start, you need a plan and obtain the required permits that apply to your situation. This includes drafting and submitting the planning and design. This may sound like a small hurdle to take, but in practice, this is the step that takes up the most time and pushes the timelines further. Note that these preparations are usually not part of the quote provided by the padel court manufacturers or general contractors. There are multiple considerations to take into account in order to receive the permit, such as space requirements and noise emission values. While these topics go beyond the scope of this article, I did write other articles on these specific topics. If you are interested, feel free to check them out using these buttons.
Groundworks
After planning and obtaining the required permits, it is time for groundworks. While groundworks are generally not part of the main court construction activities, some court construction companies offer this as part of their service. Fair enough, but what does it include you might wonder. Well, good question indeed! So let’s talk about some foundational stuff with concrete examples.
In general, the playing area of padel courts can be built on asphalt or concrete, while a partial concrete foundation is required to secure the steel construction. You might need to excavate the full area and build it from the ground up, while in other cases only limited groundworks are required.
Three shorthands to gauge how much groundwork is needed:
- Is the terrain hardness sufficient to be able to withstand heavy weights?
- Is the surface even and level?
- Is water able to drain?
If the answer is yes to all of the above questions, less groundwork is expected. If the answers to all of the above questions are no, then much more groundwork is expected.
While these are shorthands to get a feeling of the foundational work required for your situation, I strongly encourage you to have a professional expert look at your situation.
Nevertheless, if you take foundational shortcuts during the construction phase, you are likely to end up paying extra when it comes to maintenance.
Want to know more? In this article, I discussed the foundation consideration when building padel courts on a tennis court.
Check out my recent articles on Padel


Recent Posts
Padel is booming in many countries around the world, but can it actually be played in all types of weather? That is why I decided to find out the impact of the weather conditions on the court and the...
In order to not present you with the secrets alone, but provide you with some context I have weaved in these secrets when discussing the following topics: How do you take care of your padel...